Step by Step Setup of a Datamax Ticket Printer
Models ST
Sensible Cinema Box Office and
Concession for Windows
VERSION
COMPATIBILITY:
Windows XP using the Generic/Text Only driver or Windows 2000 Professional
using the Datamax Pass-Thru Driver
1. WINDOWS DRIVER SETUP
Install the Generic/Text Only Driver included with
your Windows XP computer or install the Datamax Pass-Thru Driver (found on our
CD-ROM) on your Windows 2000 computer. To install the Generic driver, use the
Add A Printer Wizard and under ᮵facturer㥬ect
宥ricᮤ under model select 帴 Only.좠style='mso-bidi-font-weight:
normal'>IMPORTANT: DO NOT INSTALL ANY DRIVER FROM THE
CD-ROM THAT COMES WITH THE PRINTER. FGL language uses the printer튩nternal (hardware) fonts for printing, not Windows True-Type fonts thus the
driver included with the printer will not work with this software. This is so
that your printer begins printing the instant you sell a ticket rather than
after a considerable delay while fonts download to your printer. A driver must
be installed on every printer with a Datamax printer attached.
If you are using Windows
2000 Professional and the Datamax Pass-Thru driver:
There are two properties for the Datamax Pass-Thru printer that must be set prior to use. Right-click the driver icon found under printers in the Windows control panel. Select ⯰erties沯m the pop-up menu. Select the 崴ings䡢 in the properties menu. Under of Line Action㥬ect 䤠a Carriage Return and a Line Feedᮤ under of Document Action㥬ect 䤠a form feed.ﺰ>
2. TICKETING SETUP
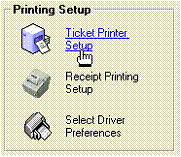
Start Terminal Setup Utility ![]() and
click the Ticket Printer Setup icon. This must be done on each individual
computer to be used for ticket printing.
and
click the Ticket Printer Setup icon. This must be done on each individual
computer to be used for ticket printing.
Select
FGL Language Thermal Ticket Printer and press OK.

3. RECEIPT PRINTING SETUP
Next, select 壥ipt Printing Setup쯺p>

Select the printer to use
for printing receipts and credit card receipts. Normally you could choose the
top radio button and use your Datamax printer as your receipt printer. If you
have a separate receipt printer from your ticket printer you need to already
have installed the driver for that printer before completing this step. If
using a separate printer for receipts, press the 嬥ctton and choose the
printer to use to print receipts.

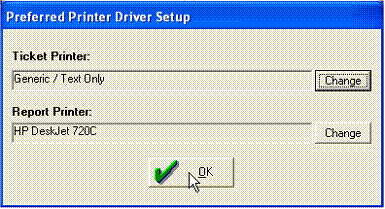
4. PREFERRED DRIVER SELECT
Next, tell the system which
printer to use for ticket printing and optionally, for report printing if this
computer is also being used to print management reports. If you are doing
reports on this computer you must install the driver for your report printer
before completing this next step.
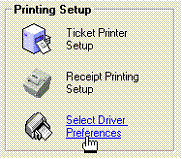
Press the 衮geton to
select the printer driver for each purpose. You may leave the report printer
field empty if you are using this station for ticketing only.
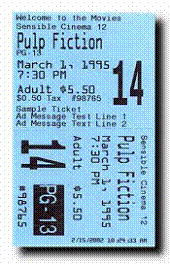
5. TICKET STOCK SETUP
Prepare your Datamax printer
to use the Sensible Cinema ticket stock sized 2蠳.25穴h a center
perforation. The small bundle of tickets included with the printer will not be
used with our software but will be used when setting up your printer for the
first time. YOU MUST HAVE THE CORRECT
TICKET STOCK IN HOUSE TO COMPLETE THE FOLLOWING STEPS. Remove
any tape holding the print platen or other moving parts during shipping.
a) Setup the
Ticket Stock ID Number:
Note: This is a setting stored in the printerŐROM
memory and must be changed.
Your printer by default is
set to stock ID #5. You must change this
setting to stock ID #0 to work with your Sensible Cinema ticket stock.
Instructions for changing this setting are on page 27 of your Datamax User
Guide. You must load tickets into the printer to complete this process. To
begin, use the blank white stock that
came with the printer to complete this step. Once you have changed the ID
to #0 then you can load your Sensible Cinema ticket stock.
b) Warm reboot
your printer:
After completing the steps above,
unload the ticket stock and turn the printer off.쯳pan>Count to 10 and turn the printer back on and
with the green ticket guide closed and locked into place, load the ticket stock
and allow the printer to position the paper and accept it into the printer.
Test the printer using the print test option found in the 宵裂the ticket
terminal software. Management security access is usually required in order to
use this capability of the software.
c) Adjustments
to tear off or printing area:
Sometimes just setting the stock ID isn८ough to align the paper for
tear-off or cut or the print area and some fine adjustment is required. See
page 26 of the Datamax User Guide for more information. One step this document fails to make clear is that you must press F3
after each adjustment to issue a new test feed before saving by holding the F3
button or your changes will be lost.쯳pan>
NOTE: Always close and lock in place the
print head then feed your tickets to load your printer. DO NOT LOAD TICKETS
MANUALLY. The step of loading the paper automatically causes the printer to
make many self adjustments to the tear/cut positioning and language options.
6. LOADING TICKET STOCK
LOADING PAPER INTO A DATAMAX PRINTER
MODELS:쯳pan>ST-3210,쯳pan>SV-3210
1) When
loading Ticket Stock, ALWAYS TURN THE PRINTER OFF.쯳pan>If you donय this, your tickets will
likely not feed into the mechanism automatically, a crucial step. Never
manually feed the ticket stock.
2) Unlatch/open
the print head and remove or blow out any loose tickets and paper slivers.
3) Latch the
print head (green mechanism) into place and ensure it is latched securely.
4) Turn
printer back on and cycle it. (The neᮤ ᵬt쩧hts flash off and on
again in usually 15 seconds or so.)
5) Slowly but
firmly push the paper into the Feed Mechanism/Print Head allowing the printer
to grab and automatically feed the paper. This step is absolutely crucial. Feed
the paper with the color side up and the text on the reverse of the ticket
going into the mechanism in an upside down orientation.
6) Print a
test ticket.
This document was created and added on May 1, 2002.